Skill Set: ATN Night Vision
Night vision equipment is cool. Being visually oriented creatures puts us at a disadvantage once it’s dark. It’s very empowering see what others can’t. For armed professionals this ability is essential. In some states it’s legal to

hunt varmints using night vision. If the zombies do attack night vision would be a good thing to have, plus shooting at night without having to use a flashlight is an evening of fun.
When Brownells began stocking ATN’s line of night vision scopes, which are affordably priced, I immediately placed an order. Brownells carries several different models of ATN’s scopes. I, of course, ordered the least expensive of the Aries MK models (#100-010-904), which is a Gen I with 2.5 magnification. This is a stand-alone scope with crosshairs, and can be used in the daytime with the cover – which has a small hole in it – over the front lens. More money gets you more magnification, or with the PS40 and PS22 series a smaller package that mounts in front of your regular day time scope and features an automatic cutoff feature for bright light.
The MK350 model runs off a CR123 battery. A push-button turns it off and on, there’s a knob to adjust the brightness of the reticle, and the scope adjustments – 1/4 minute per click – are handled with large easy to reach knobs.
Night vision amplifies the existing light. The key to being able to really see with any NV is using a good IR illuminator. The scope came with an IR illuminator but I discovered it doesn’t supply enough light for rifle work. Using an IR light such as Streamlight’s SuperTac is like the difference between night and day, allowing you to see out to several hundred yards even in pitch-black conditions.
This also provided me an opportunity to use MechArmor’s TacOps-1 charging handle. With the ATN scope, or a traditional optic, the scope has to be properly positioned to provide the correct eye relief. Usually this mounting position makes it difficult to work the AR’s charging handle. MechArmor’s handle is heavy-duty, with extended lathes, making it easy to operate with the scope. The ambidextrous design allows you to cycle the handle using either hand, so for a right handed shooter in a prone position it’s easier and requires less movement to cycle using your strong hand. This is a good piece of kit.
Mounting the scope is easy, and it’s simple to operate, just pay close attention to the directions concerning focusing. This model is bulky, adding about three pounds to your rifle, which makes it top heavy so it does take some getting use to. Also, make sure to use a good firing position to avoid getting kissed in the eye by the rear of the scope as you fire.
I think the night vision market is about to explode. There are legitimate uses for this gear, and as mentioned even if you don’t really need it the cost isn’t that bad compared to the cool factor. As with any kit practice so you know how to work it properly. Remember, it will be dark, you won’t be able to see, except through the scope, and the ability to operate all your gear in the dark is mandatory.
Skill Set: .22 Training
“What about .22’s for practicing?” (Referring to the .22 long-rifle.) This question pops up frequently during classes. “It’s good stuff,” is my response. For example, it doesn’t matter what you’re firing,youhave aim, hold, press, and follow through to score accurate hits. The same se quence applies for shooting while moving or engaging a moving target. With .22’s – even though right now even it’s difficult to find and more expensive than it used to be – you can get in more practice on the same skills for less money.
At one time practicing with a .22 meant using aweapon that was radically different from what you normally carry or shoot. Today you have the option of setting up your normal platform for .22’s with a conversion kit, or there are dedicated weapons built that are almost direct copies of what you normally use.
Since I’ve started carrying Glocks more often, specifically their 19, I purchased an Advantage Arms .22 conversion kit, a complete upper slide assembly that attaches to your pistol frame. (Two of my instructors had thoroughly tested these out so I knew it was a good piece of kit.) Installation is easy. Remove the slide and install the .22 slide. The kit lightens up the trigger pull slightly, but that’s no problem because we know to press the trigger until the weapon decides it’s time to fire, and then reset the trigger during follow through. With this kit the slide locks to the rear on an empty mag. Old mag out, new mag in, cycle the slide. And,it all fits your regular holster and mag pouches.
For AR training it’s hard to beat S&W’s M&P 15-22. This carbine gives you the same ergonomics as your standard AR; the only difference is the charging handle doesn’t cycle as far backas with a .223/5.56. These carbines come in several styles, and you can equip one to be a twin of your standard weapon. The M&P’s are affordable, and it doesn’t take much shooting to pay for it in the difference between the cost of 5.56 and .22 ammo. I’ve been practicing with mine a lot.
Learning how to operate a weapon requires repetitions. With a .22 setup like these you’re getting the same repetitions you would from your normal weapon. “But,” you ask, “what about recoil?” Useyour normal stance and grip, and then, just as with any weapon, concentrate on recovering from the recoilas opposed to trying to control it, which never turns out well. Your sight picture dictates your rate of fire; with a larger caliber it takes a fraction of a second longer to recover from the additional recoil to acquire your next sight picture.
.22’s are also a great way to introduce newshooters to firearms. We always have new shooters start with a .22 to learn the fundamentals of marksmanship and manipulations. There’s no loud noise to deal with. The reduced recoil means they don’t develop a flinch response in anticipation of the shot. After becoming familiar with these skills transitioning into a larger caliber is a piece of cake.
Success with .22’s is having good kit. Keep in mind .22’s are more sensitive to ammo than other calibers. For example Advantage Arms recommends specific ammo, as well as ammo not to use. Beneficial training/ practice relies on having everything set up as close to your normal gear as possible. Then, practice. It’s fun, affordable, and you’re developing skills you need.
Skill Set: Problem Solving
Fighting is problem solving at high speed. You’re presented a problem, and normally have a very short span of time to come up with a solution and then apply those actions. In order to develop the right answers you have to ask the proper questions.
As you go through your daily activities you’re constantly asking yourself questions, assessing the environment and making choices. Most of the time you’re not even aware of it because a majority of your actions are based on decisions made at a subconscious level. Is it safe to cross the street? Without consciously thinking about it you look both ways to verify it’s clear before stepping off the curb.
So you’re constantly making decisions, but are you asking the right questions? Specifically what are the people around you doing? Maintaining awareness of your environment is and always will be critical to survival. In the old days if you didn’t keep keen a black “painter” – that’s southern for panther – or “bare” – bear – dragged you off for lunch. Now days most our trouble comes from two legged beasts.
Spotting potential problems allows you to develop and initiate your response sooner. This means you have more options. Why did that guy in the parking lot start looking at you when you got out of the truck? Is he a threat? Is anyone else out there working with him, coming from another direction? He’s walking towards you, at the same time scanning his environment. You change directions and he stays on his original track. No trouble, but if it had been it’s a lot better to know about it sooner than later.
It’s dark. You’re walking through a parking lot. You sense a change in the atmosphere; your subconscious has picked something up that’s not quite right. Suddenly, from around a corner guy with knife moving towards you fast. Not doubt about his intent. Can you create distance? Is there time to get your pistol before he’s on you? You move left and rearward, forcing him to change directions. The pistol is in your hands, and without even being aware you’ve been telling him to stop. The big question now that you have to ask is, “Do I need to shoot?” The answer should be pretty cut and dried. If it’s not absolutely, “Yes if I don’t shoot now I will suffer serious harm,” you better be thinking about another option.
You have to shoot to stop the threat. After every shot you’re asking, “Do I need to shoot again?” This is why you practice following through after every shot, recovering from the recoil, reacquiring another sight picture and resetting the trigger. In a confrontation, there ain’t no time to shoot, look at the target, then decide you have to shoot again.
The threat is down. Now there are a lot more questions. Are there any more threats? Where is cover? The guy on the ground may get back up, are you ready? Is it safe here to call 911 or do you need to get somewhere more secure? What are you going to do when the police arrive?
Fighting is problem solving at high speed. Success depends on having as many answers as possible in advance. For example should I have to shoot to stop a threat, I’ve already made the decision to hit ’em in the chest several times and immediately follow up by hammering ’em in the pelvis. I may not have to fire that many rounds; it will be dictated by the threat’s reaction. But, in that case I’m making a decision to stop doing something, which is a lot easier than trying to remember to do it.
Start asking questions now. Figure out as much in advance as possible. Then remember, as Clint Smith always told us, “remain rigidly flexible.”
Skill Set: New AR Stuff I Like
Seems like there are new products for AR’s being introduced daily. Not all of them are good, but some are great. So, I have three products to recommend, two fairly new and one oldie but goodie.
When it came to ergonomics Eugene Stoner was a genius. The AR has all its essential  components – safety, mag and bolt release – in just the right place. On the original rifle Stoner used triangular handguards. The triangle shaped fits the shape of your hand nicely, and the flatter bottom helps when you’re resting it on something, like bracing for stability and accuracy. I have several rifles with them and really like ’em. The problem with the original design, due to the material they are made from, is they break or crack easily.
Precision Reflex, Inc. now offers their Gen III Delta shaped forearm that is free floated, set up with rails, and constructed from carbon fiber, which makes it virtually indestructible. The triangular shape works with gas or piston guns. They offer three lengths – carbine, mid-length, and rifle – with picatinny rails positioned on the top, sides, and bottom that are easily removed if you want. If you’re going mount one of these handguards be sure to get the proprietary wrench needed to torque the barrel nut.
I like fixed stocks, particularly the A1 stock, which is 5/8 of an inch shorter than the A2 version. Now, Magpul has their MOE fixed stock, (Brownells 100-009-585) which is close to the length of shorter A1 stock but with an enlarged area for an improved cheekweld. Snap the muzzle up, hit your cheekweld and you’ve got a sight picture. It has a small storage compartment and a variety of points to attach your sling. It also looks cool, which is always an advantage and may just improve your accuracy. They will soon have this same style stock set up to fit an adjustable stock buffer tube that will allow you to use one buffer tube for fixed and adjustable stocks.
The extractor spring on the AR is obviously an important part, and over the years there have been many variations offered. I’ve tried a lot of different type springs, even the chrome silicon versions – and I’ve ended up having all of them break before they should. Now, I’ve sworn off everything except Colt’s “gold” extractor spring (Brownells’ 160-304-025). Colt went through several different versions of springs and plastic inserts, eventually settling on the “gold” spring around 2003. This spring provides reliable and effective performance in both rifles and carbines.
Rifles are very personal weapons, and with the variety of parts available today there is no reason not to have one that fits your needs. Just keep in mind the deciding factor in choosing parts is your intended application of the weapon. Once you’ve figured out what you need then spend plenty of time practicing so you know how it works.
Skill Set: Manipulation Basics
There are two categories of manipulations required to operate a firearm- administrative m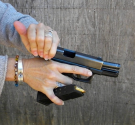 anipulations and functional manipulations. Administrative actions include loading, unloading, or checking the status of the weapon. The functional manipulations cover the actions needed to keep the firearm operating. This category includes reloading when empty and clearing malfunctions should they occur.
A lot of people take the administrative manipulations for granted, but they are extremely important, especially if your anticipated use of the firearm includes fighting. Loading, unloading or verifying the status of your weapon is normally done in the home, or somewhere similar, so these actions need to be performed safely. Also, and equally important, these manipulations serve as the foundation for all the functional manipulations, so it’s important to learn them well.
Small details make a big difference. For example following the proper sequence is critical to performing the administrative manipulations safely and properly. The correct sequence always begins with the magazine, and ends with the chamber. The loading sequence begins by inserting and seating the magazine.
Next you chamber a round, then end the process by checking the chamber, visually or physically, to verify there is a round chambered and the weapon is ready for action. The chamber or press check is cheap insurance to ensure your weapon goes bang when you press the trigger.
Unloading begins again with the magazine, except now you’re removing it, taking away the source of ammunition. The weapon is cycled to empty the chamber. We teach cycling the action three times to be sure of ejection. The administrative unload ends by running a chamber check, visually confirming the chamber is clear. Again, starting with the mag and ending by checking the chamber is critical. Cycling the action, then removing the mag means you eject one round from the chamber but with the same action chambered another round. This has lead to many people having a negligent discharge with an “unloaded” weapon.
To verify the status of a weapon you run the same sequence. Confirmation of an unloaded weapon starts by confirming there is no magazine in the magwell. I stick the fingers of my support hand into the magwell for a physical confirmation that it’s clear. I cycle the action three times, which is consistent with unloading, and finish by visually checking the chamber for clear. To confirm the weapon is loaded I remove the magazine, making sure it does have ammunition in it, and then insert it back into the weapon. I perform a press check to confirm the chamber is loaded.
Knowing how to manipulate your weapon safely and efficiently begins by learning the proper techniques to load and unload it. The key is consistency, manipulating the weapon the same way every time regardless of the circumstances. The way I unload is the same on the range during training or practice, inside my home when I’m clearing the weapon for storage, or during a fight, using the same actions to clear a Type III malfunction.
Scanning
 Humans are visually oriented creatures. The majority of input on what’s going on around us is obtained through sight. We scan to discover and avoid potential problems, formulating a response prior to trouble. In a situation when we are forced to confront a threat, scanning is mandatory for a variety of reasons. And, just like other fighting skills, we must practice scanning otherwise under stress we will not do it.
Scanning is simply using your eyes to look around, visually checking the environment for important information. What you scan for depends on the situation. When driving you’re constantly scanning the road, using your mirrors to check sides and rear and watching other drivers. Scanning helps avoid being in a wreck. Scanning while walking through a parking lot allows you to spot potential trouble and initiate a response to avoid a confrontation. It also tells any bad guys out there you’re aware of your surroundings and won’t be an easy victim.
If forced to fight, scanning is a part of the response. After the primary threat is down or gone you begin scanning. The firearm stays pointing towards the last known threat or other area of concern. You twist the head so the eyes can scan for any additional threats; in over fifty percent of violent confrontations there are more than one threat. They won’t all be lined up in a nice row in front of you. While scanning you are ready to react to the initial threat or any other threats that appear.
You scan to locate family, friends, or partners and determine what you need to do concerning them. Are they ok or down and injured? You scan to identify cover to get between you and a downed threat or additional threats. If you’re behind cover you scan for better cover. In most situations, unless you’re an armed professional, you need to scan to discover what direction to tactically retreat to a safer area or an exit to escape through.
Scanning also breaks us out of the “tunnel vision” that occurs under stress. The instinctual response to danger is to visually laser focus in on the threat. It’s like holding a cardboard tube from a roll of paper towels up to your eye and looking through it. To break this tunnel vision we need to look somewhere else and focus on another object at a different distance than the threat. Scanning also breaks you out of the mental lock we tend to get into during stressful situations.
Scanning, like any other technique, must be practiced. You can always choose not to scan, but if you don’t make it part of your standard response you won’t have it when you need it. When scanning you don’t look to see if everything is O.K. That attitude will cause you to miss something important. Scan like you know there is something out there to find.
God gave us excellent visual capabilities. Take advantage of this gift. Our vision allows us to make it through every day life safely, and during a violent confrontation scanning is an essential element of victory.
Shoulder Pocket
 When it comes to long guns one of the most common issues we see is shooters not getting the stock of the weapon in the actual pocket of the shoulder. This creates several problems. If you’re firing something with serious recoil, especially shotguns, the stock will slam into the shoulder with enough force to bruise. The stock needs to be in the pocket for accuracy, creating a consistent platform and efficient recovery from recoil for follow up shots. Getting the stock located in the pocket is also crucial for efficiency. When you bring the muzzle up and obtain a cheek weld against the stock the sights should fall into alignment with your eyes, without having to reposition your head.
To find your pocket bring the right arm up, for right-hand shooters, so it’s angled ninety degrees to the body, bending the elbow so the hand is positioned where it would be if holding the grip of the gun. Take your support hand, holding the fingers straight, and find the high point on the front of the collarbone. Now slide the hand outboard, towards the shoulder, following the radius of the collarbone. Your hand will dip down, or inward, and keep sliding until you hit the deltoid muscle of the shoulder. This low spot is your pocket, and where the heel of the stock should be positioned.
How much of the stock you have in the pocket, or the height of the stock, depends on what type weapon you’re firing. The idea is that when you bring the muzzle onto target and obtain a cheek weld on the stock the sights should be aligned with your eyes. For guns with low sights, such as shotguns, the entire heel will be in the shoulder. The same position holds true for a bolt-action rifles, even those with optics higher than the barrel. Unless your stock is adjustable or has a raised comb you’ll have to add material to the stock, raising the comb of the stock so you can get a proper cheek weld. A cheek pad -Brownells # 851-200-500 – works well for this. In the field you can use duct tape and foam pipe insulation.
AR’s are completely different. Due to the rifle’s design and offset between the sights and barrel only about the bottom half of the stock’s heel should be in the shoulder. This allows you to hit a solid, consistent cheek weld and obtain a good sight picture without having to reposition your head and eyes. If you put the stock too low in your pocket you have to shove your head forward or tilt it sideways to obtain a sight picture. Neither one of these options are good.
The key, as always, is consistency, and consistency is the result of practice. Dry practice is best. You start in the low ready position, stock properly positioned in the pocket and muzzle depressed, visually focusing on the exact point you want to place the shot. You bring the muzzle up and obtain a solid cheek weld. The sights should now be in alignment with the eyes. Lower the muzzle down, and repeat, over and over, until it becomes natural.
Simple and Complex
 It’s a simple task. Stop by the store to pick up the items on your list. Walking through the entrance of the super-store you accidentally bump shoulders with a guy going out trough the in door. You glance over, say “‘Scuse me,” and walk on. Nothing big.
The man has a little alcohol and a bad attitude ’cause his “old lady” is giving him grief. You hear him ask the woman in a loud tone if she saw what just happened. You start paying closer attention because this simple thing could develop into something more complicated. In the reflection off the glass door ahead you see him stop, point at you, and say a few words to the woman, some which you have no problem lip-reading. You continue walking, keeping in mind that things may have just gotten serious.
From the magazine rack you can keep an eye on the doorway so you stop by to check out the gun publications. Maybe it was nothing. After a few minutes you head deeper into the store to complete your purchases.
You scan as you exit into the parking lot. The first thing you notice is the woman who was with the man is now standing near the first set of cars in the lot and acting anxious. Movement draws your eye. From around the corner steps the man. Held low and against his leg is a knife. This is complicated and serious. He moves towards you, his intent clear. You present your pistol while moving to create distance. “Stop, drop the weapon now!” He ignores the command. The knife comes up and he continues advancing. The distance between the two of you is decreasing rapidly.
At this point what was a complicated situation suddenly becomes simple. You’ve exhausted every option in an attempt to avoid it, but the only solution to the problem – and a fairly easy one to execute as long as you’ve practiced – is shooting to stop the threat. Mentally and physically you cycle through your mantra, “Front sight press, front sight reset.” The threat reacts to the first shot immediately. He clutches his side, turns and begins running away. The woman follows.
The threat is gone. The last twenty seconds occurred in slow motion, but now it seems like time is speeding up. A lot of things are happening at once; your senses overloading as they attempt to compensate for lost time. You’re glancing around. A crowd is gathering. You hear voices and realize the sirens in the distance are growing louder each second and that the pistol is still in your hands. The situation is becoming complicated, again.
During daily life we constantly flow back and forth between simplicity and the complex. Sometimes a dramatic shift occurs. A completely unexpected and complex situation takes on lethal qualities. Success in life relies on the ability to flow between the simple and complex, the known and unknown, constantly maintaining the correct balance between the two. Victory demands this.
M&P 547
 A friend stopped by and we were doing the show-‘n-tell thing with S&W revolvers. He pulled out a “K” frame – three inch barrel and round butt – and handed it over to me for inspection. I’m thinking Model 13, which already had me drooling, but then I notice a short, stubby hammer that looked factory. There were funny looking holes in the cylinder and a strange looking extractor. With a questioning look I glanced over and he said, “Model 547, 9mm.” Not only had I never seen one, I didn’t even know there was such a thing.
The 547 was developed by S&W in the late 1970’s for the French National police, who were looking to standardize their arsenal. Basically it was the F.B.I. model 13 modified to fire 9mm. Two versions were produced between 1980 and ’85; a three inch round butt and a four inch with a square butt. (According to my Standard Catalog Of Smith & Wesson only about 10, 270 of these pistols were built.) After tests the French went another route, and the 547 never really caught on with revolver shooters or fans of the 9mm.
In order to run the 9mm the 547 had several unique design features. The extractor is grooved, and inside the grooves are six spring steel fingers that pop out to engage the extractor grooves in the 9mm case. A flat hammer, without a firing pin, strikes two pins, a free floating firing pin and a cartridge retaining pin. The retaining pin prevents the case from bouncing back as it’s fired, resulting in the firing pin punching a hole in the primer, and maintains the proper headspacing for the cartridge. A stronger mainspring was used to ensure ignition of primers, especially the harder primers found in most European ammo.
“If you ever decide to get rid of this,” I told Tim, “…” A few minutes later I was the proud owner of a 547. Finally, today, I hit the range to test fire it. The very first thing I notice is the short trigger pull, which I guess is due to the design of the pistol’s action. I also figured out real quick that my speed loaders for .38/357 wouldn’t work on the 9mm case. (If anyone has any HKS #547 loaders out there for sale let me know.) My quick solution was to use a 9mm magazine to feed the cylinder.
At seven yards, using double action, the pistol shot extremely well, more accurately than I could fire it. The trigger pull is stiff than due to the mainspring mentioned above. It never failed to eject empty brass. Feeding the rounds from a magazine, keeping the revolver in the strong hand, worked well because you have to kind of wiggle the rounds into the cylinder. Plus it’s an easy way to carry lots of reloads for the revolver.
I’ve never sent a revolver to S&W to have it reworked, but I think this will be the first. The 547 is cool, you don’t see many of them, and it’s one I’d like to get reblued and looking sharp. I’ll let you know how this turns out.
Smokin’ in the Dark
 One of the first things people notice when they begin low-light training is exactly how much smoke is created when you discharge a firearm. The amounts are magnified when firing high-velocity rifle rounds. Plug a flashlight into the equation and the smoke becomes even more apparent from all the reflection created by the light. Depending on what type ammo you’re shooting and how many rounds you fire the smoke can become dense enough it starts to limit your vision, which drastically affects your capabilities.
There are a variety of different ways to deal with this problem, and as always the situation determines your best option. An easy, quick technique to apply is simply stepping off line from where you were firing. Taking a step or two laterally away from the location you were firing puts gives you a different view of the area without having to look through as much smoke. The circumstances determine whether you leave the light on, maintaining visual contact with the threat as you move, or turn the light off so it doesn’t attract fire from any additional sources you haven’t located yet. When you have a good covered position or the situation doesn’t allow you to move then after firing a few shots you may need to turn off the light, let the smoke clear, then turn the light back on to see what’s going on downrange.
Even with a weapon mounted light there are a lot of reasons to have a hand-held with you. For example after firing using the weapon mounted light you can use a hand-held light, holding it off to the support side like the old F.B.I. technique so the light is shining from a different angle and isn’t creating as much reflection off the smoke and penetrates more into the environment. A capable partner works really well in low-light situations. They can light the threat from another location while you fire, or you can light the target up, fire and cut your light off. As you kill your light they turn their light on to keep a visual on the target. Obviously this takes some planning, practice, and communication.
There are all type tricks or techniques for dealing with the fog of war that results when you start firing off rounds in low-light environments. For example you may figure out that while your red-dot works great on setting “X” for using the flashlight once the smoke pops it needs to be a little brighter. The key, as always, is to figure out how to use your gear properly what techniques work well in advance so it’s not a distraction when you have to deal with it for real.
Since we know that the majority of confrontations occur in low light environments it’s up to you to make sure you’re ready. The only way to get this experience is to hit the range for live fire practice, in the dark, using both hand-held and weapon mounted lights.
About
 Shootrite founder and director Tiger McKee is a lifelong student of personal combat, and is one of the nation’s top firearms instructors for armed citizens, law enforcement, military and security personnel.
McKee was awarded an expert rating with handgun and rifle by Colonel Jeff Cooper of Gunsite, and has been an adjunct instructor at Thunder Ranch since 1995.
He has assisted various agencies in designing their own customized training programs, and as an adjunct instructor for the Federal Bureau of Investigation he currently enjoys teaching some of the world’s most elite law enforcement agents.
Tiger’s extensive experience has given him a prominent position and voice in the world of modern tactical training. He is a regular guest on Personal Defense TV, a staff writer for SWAT magazine, Tactical Gear magazine, and a columnist for the Tactical Wire, an internet publication. In 2005 he published “The Book of Two Guns,” a unique chronicle of ten years of training in the tactical use of the 1911 pistol and the AR-15.
Website: http://www.shootrite.org
Contact for Training: 256-582-4777
